
Intended Audience
This post will be of interest if you are considering revisiting MS-DOS 6.22, the last standalone version of Microsoft DOS, and Windows for Workgroups 3.11 (WfW), the first commercial version of Windows to gain any real traction.
For this post, I’m working with VirtualBox 5.2.12 under Windows 10 Home (build 1803). A working knowledge of VirtualBox is assumed. Some familiarity with DOS is also assumed.
Edit (08/04/2020): According to this thread, the highest version of VirtualBox to still support WfW is VirtualBox 6.0.18.
Background
I intended to stop the Windows virtual machine (VM) challenge at Windows 95 and wasn’t planning on going back as far as WfW. However, WfW is where my love affair with Windows first began. Plus the allure of bringing WfW back to life again in all of its former glory was just too great to pass by. So detailed in this post are the steps I took to resurrect WfW in VirtualBox. These should serve as signposts for those who also wish to embark on a similar journey on the road less travelled to a time when Windows was just an immature little child that often behaved badly!
There’s a 2012 post here that covers the installation of WfW in VirtualBox in quite good detail. However, it’s missing a key component, which is required to make WfW work on top of modern day processors. It could also be streamlined a little better. The post here (circa 2004) includes all the software and patches required to get WfW working under VMware. However, it seems to make the assumption that the reader has access to a physical floppy drive. I’ll be blending elements of both posts to provide a fresh look at getting WfW working in VirtualBox.
Tools you will need:
- 7-Zip or equivalent, for unpacking .7z files.
- ImgBurn or equivalent, for creating a CD-ROM image (.ISO).
- A means of creating a floppy image (.IMG). I thought ImgBurn would do the trick for me, but I couldn’t create a readable floppy image with it. As I already had access to later versions of Windows in VMs, I used the technique described here to create floppy images.
Installation Steps
I’ve outlined nine steps to follow to construct a WfW VM with sound, super VGA display, local network and browser support.
- Build the utility images
- Create the VM
- Install MS-DOS 6.22
- Install WFW 3.11
- Enable CD-ROM support
- Enable sound
- Enable network
- Enable SVGA
- Install browsers.
Step 1: Build the utility images
In this step, we’re going to build two images. The first is a floppy disk image of the CD-ROM driver for MS-DOS. This will enable us to transfer the driver from the host system to the target VM via the VirtualBox floppy drive. Once the CD-ROM is enabled in the VM, we’ll use the second image, a CD-ROM image, to deliver patches and software to WfW via the VirtualBox CD-ROM drive. Why do we have to interact with the VM this way? The reason is there are no VirtualBox guest additions pre-Windows 2000, so this is a way of moving software and patches between the host system and target VM.
Download Windows 311 VMware.zip from Tony’s VMware site. It contains all of the patches we require. Unpack the zip. You should be able to identify a group of five folders.

We’re going to add three more directories to this group to accommodate display drivers, IE and Netscape browsers.
Create the directory SVGA in this group. Under the heading Installing display drivers in this post, follow the steps to download the specified files. Extract the files from the zip and place them together with the downloaded SVGA.EXE file into the SVGA folder.
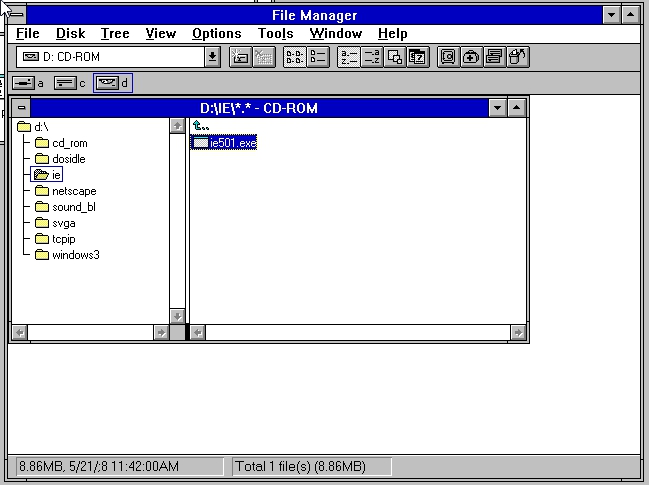
Create two other directories, IE and Netscape. Search for and download IE 5.01 and Netscape 4.08 executables and place them in their respective directories. These are the highest versions of those browsers made for WfW.
These are the directories you should end up with.

Now, using a product such as ImgBurn, create a CD-ROM ISO image containing these directories. In addition, enter the CD ROM directory and create a floppy IMG image of the AOATAPI.SYS driver. Note that ImgBurn won’t work for this.
Step 2: Create the VM
In VirtualBox, create the VM that will house DOS and WfW. Base this on a Windows 3.1 profile. Accept the defaults. No tweaking necessary at this stage. Why DOS and WfW? WfW was an application that ran over the top of DOS.
Step 3: Install MS-DOS 6.22
You can download a zip file containing floppy disk images for MS-DOS 6.22 from here. When installing DOS in the VM, as I reside in Australia, I changed the country system setting from US to UK (there isn’t an Australia option) to ensure the date was in dd/mm/yy format. I accepted all other defaults.
Step 4: Install WfW 3.11
You can download a zip file containing floppy disk images for WfW from here. When installing WfW in the VM, accept the defaults, but take note of the following:
- Don’t bother installing a printer. Unless you have a working printer from the nineties, it’s highly unlikely that you’ll find a WfW driver for your modern printer.
- Ignore network setup at this stage.
After WfW installs successfully, unload any floppy images, reboot and start WfW.
C:\> win
Note that the display is standard VGA 640 x 480 and there isn’t any sound. Using file manager, note the absence of CD-ROM support.

Step 5: Enable CD-ROM support
Exit WfW, if you’re in it, back to the DOS prompt. Load the floppy disk image containing the CD-ROM driver and copy the driver to the C: drive.
C:\> copy A:\AOATAPI.SYS
Add the following line to AUTOEXEC.BAT:
c:\dos\mscdex.exe /d:idecd000
Add the following line to CONFIG.SYS:
device=c:\aoatapi.sys /d:idecd000
Unload the floppy image, reboot and enter WfW. This time, using the File Manager, note the presence of CD-ROM support.

Step 6: Enable sound
Exit WfW, if you’re in it, back to the DOS prompt. Load the CD-ROM utility image and install the SoundBlaster drivers. Accept all the defaults.
D:\SOUND_BL> install
When you next enter WfW, you will notice there is sound. A SoundBlaster audio group will also have been created.

Step 7: Enable network
First, install the Microsoft Windows Network: Program Manager > Main > Windows Setup > Options > Change Network Settings…

…Networks > Install Microsoft Windows Network > OK…

Next, install the AMD PCNET Family network adapter from the CD-ROM.
…Drivers > Add Adapter > Unlisted or Updated Network Adapter > OK > Browse… to the directory shown in the screenshot…

…OK > OK > OK > Close…

…OK. Now, enter your desired credentials and click OK.

You may see an error like the one below. The installation program is looking for WfW disk 7. Load it and then click Retry.

Network components will begin to install. At some point, you’ll be presented with the dialogue box shown below.

This time, navigate to the CD-ROM directory shown below…

…OK > OK > OK. Unload the floppy drive and click Restart Computer.
Attempting to run Windows will result in WfW hanging.

To overcome this, we apply the same trick used to get Windows 95 working in a VirtualBox VM. Exit the WfW VM. Under the WfW settings for the VM: Settings > System > Acceleration > uncheck Enable VT-x/AMD-V > OK.

You should now be able to successfully start WfW. Note: If you’re building WfW under VMware, use DOSIDLE on the CD-ROM image to achieve the same effect.
Next, add the Microsoft TCP/IP protocol driver: Program Manager > Main > Windows Setup > Options > Change Network Settings… > Drivers > Add Protocol > Unlisted or Updated Protocol > Browse… to the CD-ROM directory shown below…

…OK > OK > OK to arrive at the screen below.

Unless you’re using IPX/SPX on your network remove it. First, highlight the entry, then click Remove > Yes to arrive at the screen below.

Now, enable DHCP and restart the VM: Close > OK > Check Enable Automatic DHCP Configuration > Yes > OK > OK > Restart Computer.
When you log back in, you’ll notice a Microsoft TCP/IP program group. An FTP and Telnet client will have also been installed.

The local network will not be browsable as the VM is effectively isolated from the rest of the network. In order to make neighbourhood computers visible, exit WfW and shut down the VM. The network settings for the WfW VM need to be changed from NAT to Bridged Adapter: Settings > Network > Attached to: Bridged Adapter > OK.
When in WfW, you can browse the local network using File Manager: Program Manager > Main > File Manager > Disk > Connect Network Drive…

While the local network is browseable, SMB servers will only be accessible to WfW if they support LANMAN. More information about this behaviour can be found here.
Step 8: Enable SVGA
Exit WfW and back to MS-DOS 6.22 if you are in Windows. Make sure the utility CD image is mounted. Execute the following commands to place a patched version of SVGA drivers for WfW in the directory C:\SVGA.
C:\> mkdir svga
C:\SVGA> cd svga
C:\SVGA> copy d:\svga
C:\SVGA> svga
C:\SVGA> vgapatch p
Now log into WfW and enable the highest resolution Super VGA driver: Program Manager > Main > Windows Setup > Options > Change System Settings… > Display: Other display (Requires disk from OEM)… Type in the path to the patched drivers as shown below…

Click OK. Choose Super VGA 1024 x 768 256 small…

…OK > OK > Restart Windows. On entering WfW again, you’ll have much more usable real estate and you won’t feel like you’re working through a keyhole.

Step 9: Install browsers
Internet Explorer 5.01
As you work through this section, you will notice that the IE installation package is rather clumsy in the way it configures itself. It just feels like it has been cobbled together rather hurriedly.
Ensure the utility CD-ROM image is mounted. Navigate to and execute the installation file for IE. Note: Skip the modem setup during installation.
After installation, you’ll be prompted to reboot. When you reenter WfW after the reboot, you’ll be prompted to set up your time zone.

After setting up the time zone, a Microsoft Internet Tools program group will be created.

Double-click on the Internet Explorer icon. The Get Connected! screen of the Internet Connection Wizard appears. Click Cancel and then Yes to exit the wizard (and IE). Double-click on the Internet Explorer icon again. An hourglass appears. Click Stop to cancel whatever IE is trying to do. Click Tools > Internet Options. Very few modern web pages will render properly in IE without crashing it. To test IE, we’ll point to a very basic web page I managed to find. Under the General tab, change the Home page URL to the address shown below and then click Apply.

While still in Internet Options, click on the Connections tab and dismiss the dialer warning that appears. For the Connection, choose the radio button for Your local area network or another dialer. Click OK to exit the Internet Options dialogue box. Click OK to dismiss the Connection dialogue box that appears. Exit and enter WfW again. Double-click on the Internet Explorer icon. The web page shown below should appear.

Netscape Navigator 4.08
Ensure the utility CD-ROM image is mounted. Navigate to and execute the installation file for Netscape.

The Netscape installation feels much more polished than the IE installation and, unlike IE, does not require a reboot after the installation. A Netscape Navigator program group will be created.

Double-click on the Netscape Navigator icon. Follow the prompts to create a user profile. We’ll do the same thing as IE and point Netscape to the same basic web page. Click Edit > Preferences and change the Home page URL to the address shown below and then click OK.

Click the Home icon on the Netscape toolbar to bring up the website shown below.

References
Comments