
Intended Audience
This post may be of interest if you want to give end users the ability to recover lost files by giving them read access to their own backed up data.
The steps in this post are executed from a Windows 7 PC. For a later Windows 10 version of this post refer here.
Assumptions
- The reader has been redirected here from this post.
Background
In the original post, a third party was responsible for recovering end user data. Is it possible to get rid of the middle man and have end users responsible for recovering their own data? It certainly is!
There is a little extra work that the system administrator will have to do to set this up, but the benefits are substantial. The result is that end users will be able to restore their own data without referring to other personnel.
Overview
The key is to set up permissions for the backup repository such that the following objectives are met:
- End users should only be able to see their own data.
- End users may read their own data in the backup repository, but not modify or delete it.
- System administrators have full access to the backup repository.
- Resilio Sync is the owner of the backup repository.
To achieve the desired goal, step 5 in the original post is replaced with the following steps:
Step 5A: Adjust permissions on the backup share.
Step 5B: Give end users read access to their own data within backup.
Step 5A: Adjust permissions on the backup share.
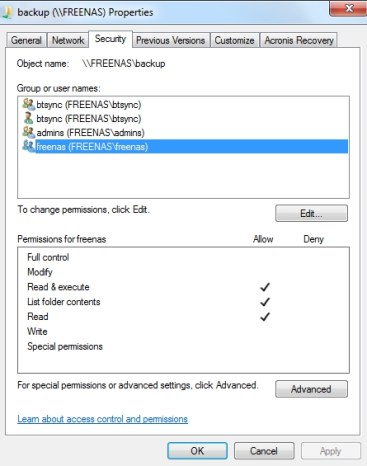
Share permissions of backup when first viewed from Windows:

Adjust share permissions such that only freenas users (in this case belonging to the group freenas) have read access to backup. Also allow system administrators to have full access to the share.
Step 5B: Give end users read access to their own data within backup.
In the example below, within the backup share , user basil owns two devices and user sachika owns one.

Directory permissions are now adjusted so that the end users can read their own data. Using Basil’s Nexus 6P Camera backup as an example:

Notice that permissions have been inherited from the share. This has to be altered so that only user basil should be able to view backed up data for the Nexus 6P. To achieve this, it’s necessary to remove read access to that data for other users by removing the group freenas and granting basil read access.
Use the Edit button to add user basil with read access.

Attempting to remove freenas throws up the following error:

Exit this screen and then click OK to allow permissions for basil to propagate through the directory tree.

When permission propagation is complete, click the Advanced button.

Next click the Change Permissions button.

Uncheck Include inheritable permissions from this object’s parent. The dialogue box below appears.

Clicking Add returns you to an unchecked Change Permissions dialogue box.

Now remove the freenas entry.

Click OK to allow security information to be propagated through the directory tree. Once complete, click OK to exit the Advanced editing dialogue box and return to the Properties dialogue box.

Repeat step 5B for each top level directory in the backup share.
When complete, note that system administrators still have full visibility of all directories in the backup share.
However, when the backup share is viewed by an end user, say basil, only directories pertaining to the end user will be visible.

References
Comments